How to Make a Cookbook (From Recipes to a Printed Book)
How to make a cookbook in 7 steps: pick the angle, test and write the recipes, shoot the photos, lay out the pages and print. With a real recipe spread to copy and KDP print costs.
How do you make a cookbook? Pick one clear angle, choose 30 to 80 recipes, test every one, write them all the same way, photograph the dishes, lay out the pages at a print trim size, then print or sell it. The recipes are the work. The layout and printing are the part most guides skip, so this guide shows a real recipe spread and real print costs from KDP (checked November 8, 2026).
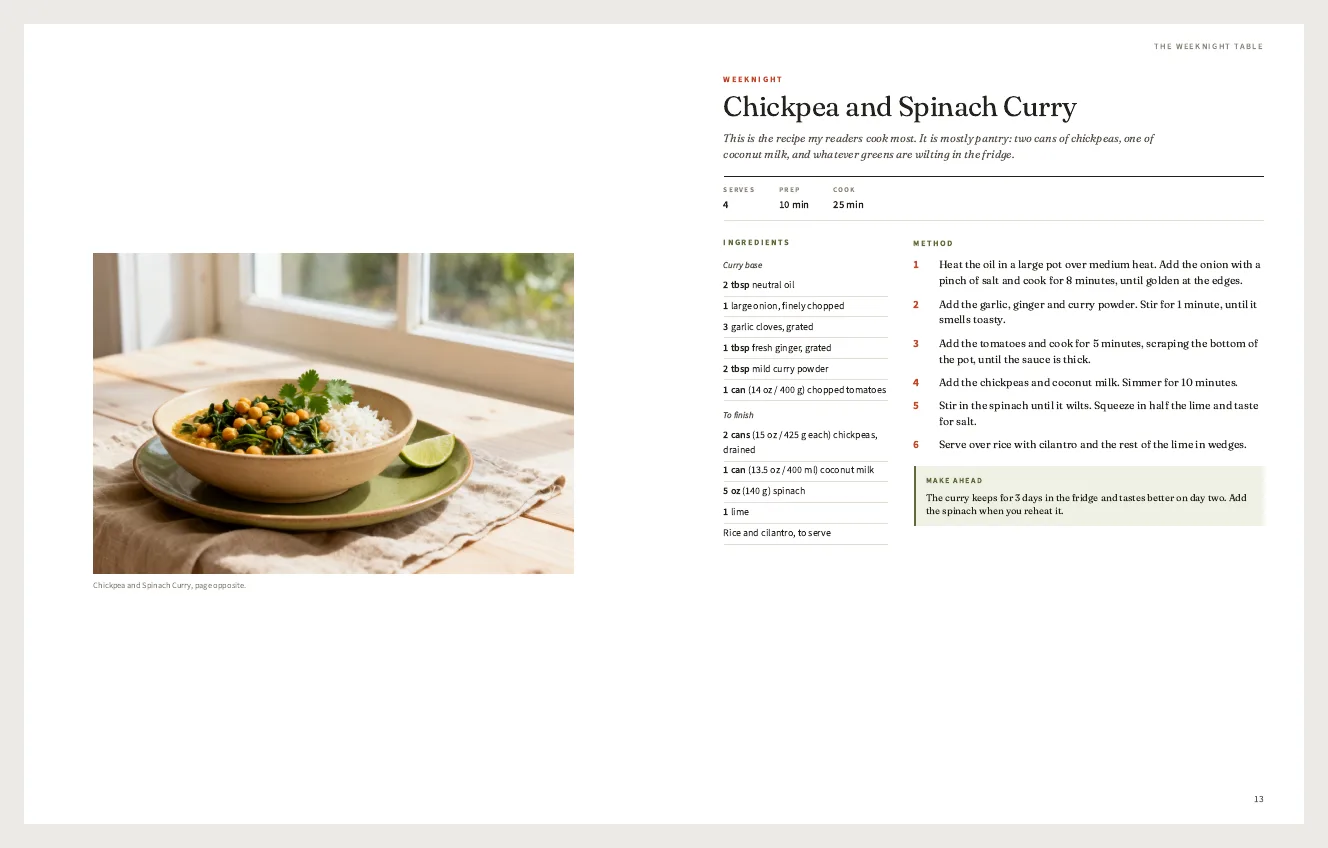
A spread from our 8×10 cookbook sample. Download the full sample PDF (23 pages, no sign-up).
Step 1: pick the angle and the reader
"My favorite recipes" is not an angle. "Vegetarian suppers in 40 minutes", "sourdough for beginners" and "one-pan dinners for two" are. An angle tells a buyer in one line who the book is for, and it tells you which recipes to leave out.
Decide early whether you are making a book to sell (to your blog readers, your class, your customers) or a family book for a few relatives. The steps are the same; the photos, the page count and the print run change. There is a section for family cookbooks at the end.
Step 2: choose the recipes and plan the chapters
Most cookbooks hold 30 to 80 recipes. Sort them into 3 to 6 chapters that match how the reader cooks: by meal (breakfast, weeknight, baking), by season, or by main ingredient. Write the contents page first. If a chapter has only two recipes, merge it into another one.
Plan the back of the book now too: a conversion chart (oven temperatures, cups to grams) and an index by ingredient, so a reader with a bag of lentils can find every lentil recipe.
Step 3: test every recipe
Cook each recipe from the written page, not from memory, and ideally ask someone else to cook it too. Record what really happened:
| Recipe | Yield (as written / real) | Time (as written / real) | Pan or oven used | What went wrong | Change to the text |
|---|---|---|---|---|---|
| Chickpea curry | Serves 4 / 4 | 35 min / 40 min | 5 qt pot | Onions took 8 min, not 5 | "cook for 8 minutes, until golden at the edges" |
| Country loaf | 1 loaf / 1 loaf | 14 h rise / 12 h at 75 °F | 5 qt Dutch oven | Bottom too dark | Add "on a middle rack" |
Copy these columns into a spreadsheet and fill in one row per test. A recipe passes when a second cook gets the same result from the text alone.
Step 4: write every recipe the same way
Readers learn the pattern of your page after one recipe. Keep it the same everywhere:
- Title that says what the dish is.
- Headnote: two or three sentences on why this recipe, or one tip that saves it.
- Yield and times strip: serves, prep, cook (and rest or rise if it matters).
- Ingredients in the order you use them. This is the core rule of recipe editing: "present the ingredients in the order in which they are used" (Denise Landis, The Cook's Cook, checked November 8, 2026). Group them under small headings (sauce, to finish) when a recipe has parts.
- Numbered method, one action per step, with a visual cue for doneness ("until golden at the edges"), not only a time.
- A tip or variation box for swaps and make-ahead notes.
The right-hand page in the spread above shows all six parts.
Step 5: photos
You do not need a photo for every recipe. A clean text page reads well and keeps print costs down; plenty of cookbooks leave some recipes without one.
- Light: shoot near a window in daylight, with the light from the side. Turn off the kitchen lights so the colors stay true.
- Resolution: KDP asks for images of 300 DPI at the printed size (KDP Help). A photo 1,800 pixels wide can print up to 6 inches wide. Modern phone cameras give more than that.
- Frame the photos inside the margins. A photo that runs off the edge of the page needs bleed, and on KDP, if one page bleeds, the whole file must be set up for bleed (KDP Help). A white frame around every photo is a classic cookbook style and avoids that.
Step 6: lay out the pages
Choose the trim size
| Trim | Good for | KDP size class |
|---|---|---|
| 8×10 in | Photo and recipe on one page; the classic cookbook shape | Large |
| 7×10 in | Text-heavy books in black ink | Large |
| 8.5×11 in | The most room; binders and workbook-style books | Large |
All three are "large trim" on KDP (wider than 6.12 in or taller than 9 in), so the cost per page is the same.
Check the print cost before you choose color
Color is where cookbook budgets go. Here is a 120-page 8×10 book, worked out with KDP's US formulas (printing cost, royalty):
| Ink | Formula (large trim) | Print cost, 120 pages | Royalty at $24.99 (60%) |
|---|---|---|---|
| Premium color | $1.00 + $0.08 a page | $10.60 | $4.39 |
| Standard color | $1.00 + $0.0402 a page | $5.82 | $9.17 |
| Black ink | $1.00 + $0.017 a page | $3.04 | $11.95 |
Standard color is only offered for books of 72 to 600 pages. Premium color starts at 24 pages (KDP Help). If your book is under 72 pages and must be in color, it has to be premium.
Build the pages
A cookbook interior needs a title page, a copyright page (add a line about allergens and food safety), contents, a "how to use this book" page, chapter openers, the recipes, the conversion chart and the index. Use mirrored margins with a wider inside margin; KDP's minimum gutter is 0.375 in for up to 150 pages.
The fastest way to get there: start from the 8×10 self-publishing cookbook layout. It has one-page recipes, photo-and-recipe spreads, chapter openers, a conversion chart and an ingredient index, with every photo inside the margins. Paste or upload your recipes and the layout follows. If your recipes are already in a Word file, you can also format a cookbook manuscript with the AI book formatter.
Step 7: print or sell it
- Amazon KDP paperback. Print on demand: no stock, no upfront cost, sold on Amazon. Follow the self-publishing steps for any book for the ISBN, upload and proof. Then self-publish your cookbook with an interior that fits KDP's rules.
- A PDF on your own store. Food bloggers often sell a digital cookbook first. An A4 recipe book PDF to sell suits screens and home printers better than a print trim.
- A short print run. For a few hundred copies to sell at events, ask local printers for offset quotes; prices vary too much by quantity and paper to quote here.
Making a family cookbook
The same steps work for a family book, with three changes:
- Gather the recipes from people, not from your head. Ask each relative for two or three dishes, and the story behind one of them. Write that story into the headnote.
- Keep the handwriting. Scan handwritten recipe cards at 300 DPI and put the scan next to the typed recipe. It is often the page people remember.
- Print a few copies. A KDP paperback needs no minimum order, so you can order author copies for each household.
Ready to lay it out? Start with the 8×10 self-publishing cookbook layout, and read the self-publishing steps when you are ready to upload.
Put this guide to work
 Baking Guide template
Free, edit with AI
 Minimal eBook template
Free, edit with AI
 Self-Published Book template
Free, edit with AI
Or describe your document and the AI eBook generator writes and designs it. You can also try the AI lead magnet generator.
See all Book and Cookbook Templates.